Storage Server
The Storage Server keeps the data that must stay after a unit or a WebClient disconnects. It is a new server. The earlier Node.js backend did not have it.
Units / WebClient <--> Communication Server <--> Storage Server <--> SQLite file
What It Does
Keeps tasks, missions and news for each account.
Keeps messages for a unit that is offline (the offline queue). When the unit connects again, the unit gets these messages.
Stores all data in one SQLite file. You do not need a database server.
Sends news to all WebClients of the system, or of one account, at once.
Has an admin dashboard to monitor the data, post news and set the quotas.
Units and the WebClient never connect to the Storage Server. Only the Communication Server connects to it, over an S2S link.
Program: de_storage_server · Source code:
droneengage_storage_server
Admin Dashboard
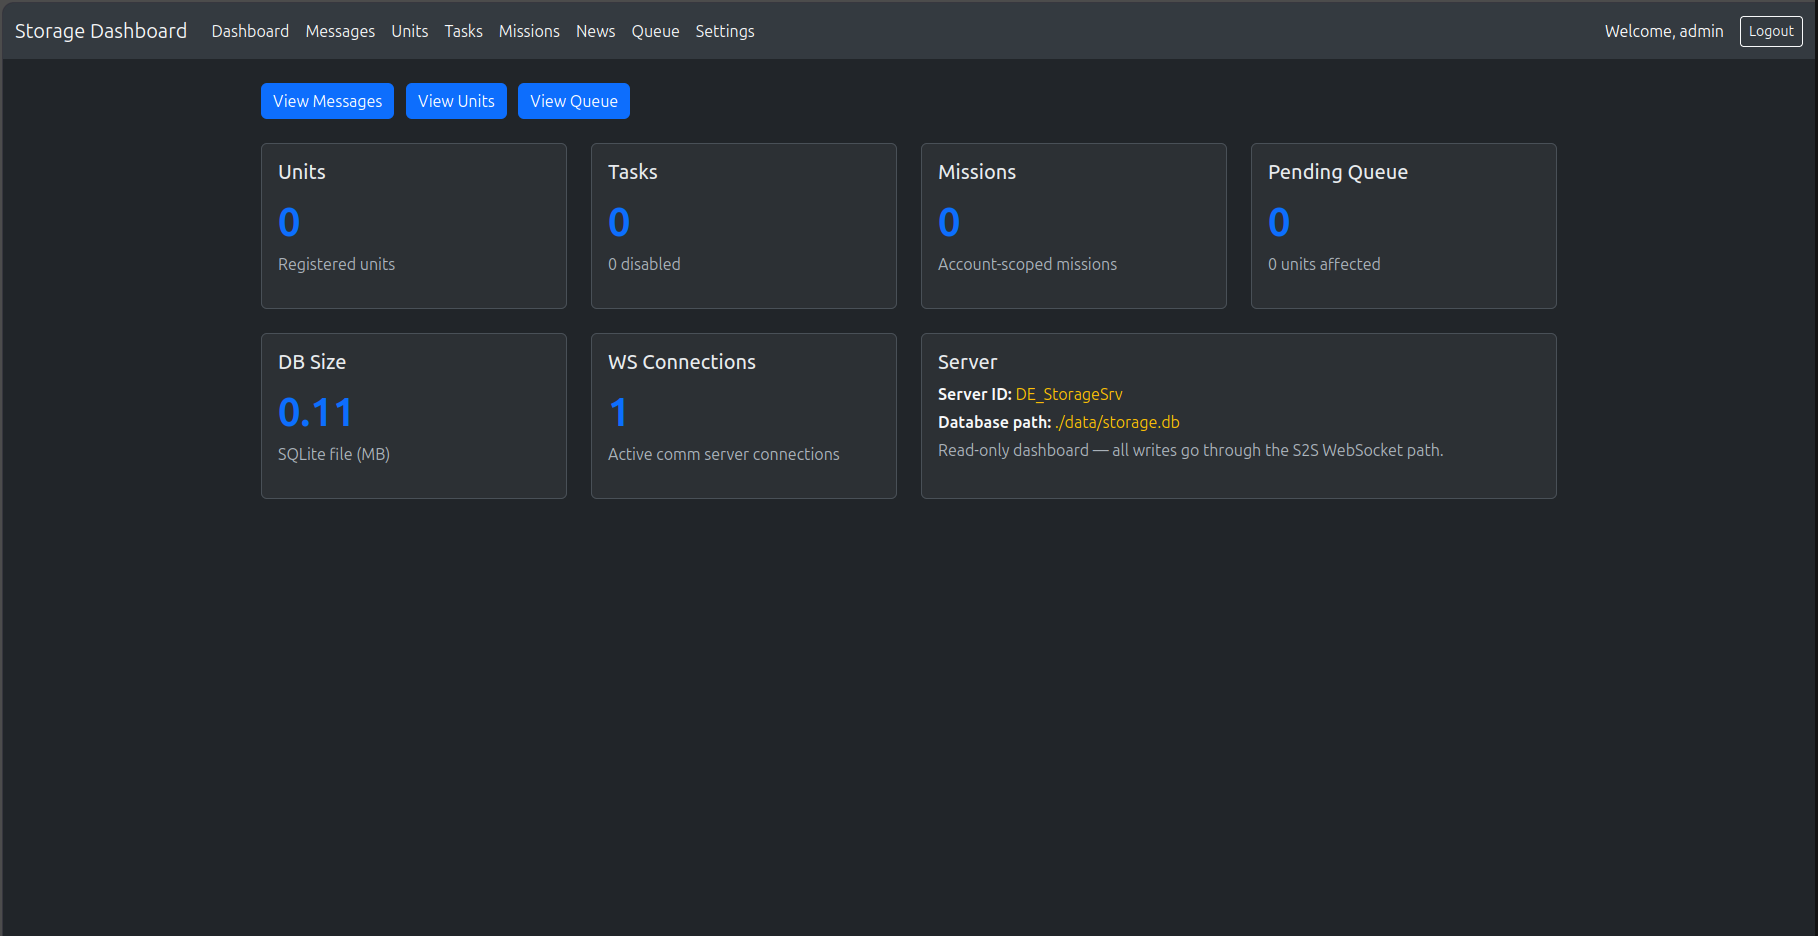
The dashboard is a web page of the Storage Server.
Open
https://<pi-address>:9001/admin/login. If you setdashboard_url_guid, openhttps://<pi-address>:9001/admin/<guid>/login.Log in with
admin_usernameandadmin_password.
Note
In the default server.config, the dashboard listens on 127.0.0.1
only. Set dashboard_listening_ip to 0.0.0.0 to open it from the
network. On the air-gap card it is open on the Wi-Fi:
https://airgap.local:9001/admin/login. After 5 wrong logins, the dashboard locks that
user for 30 minutes.
Page |
What you can do |
|---|---|
Dashboard |
See the number of units, tasks, missions and queued messages, the database size and the WebSocket connections. |
Messages |
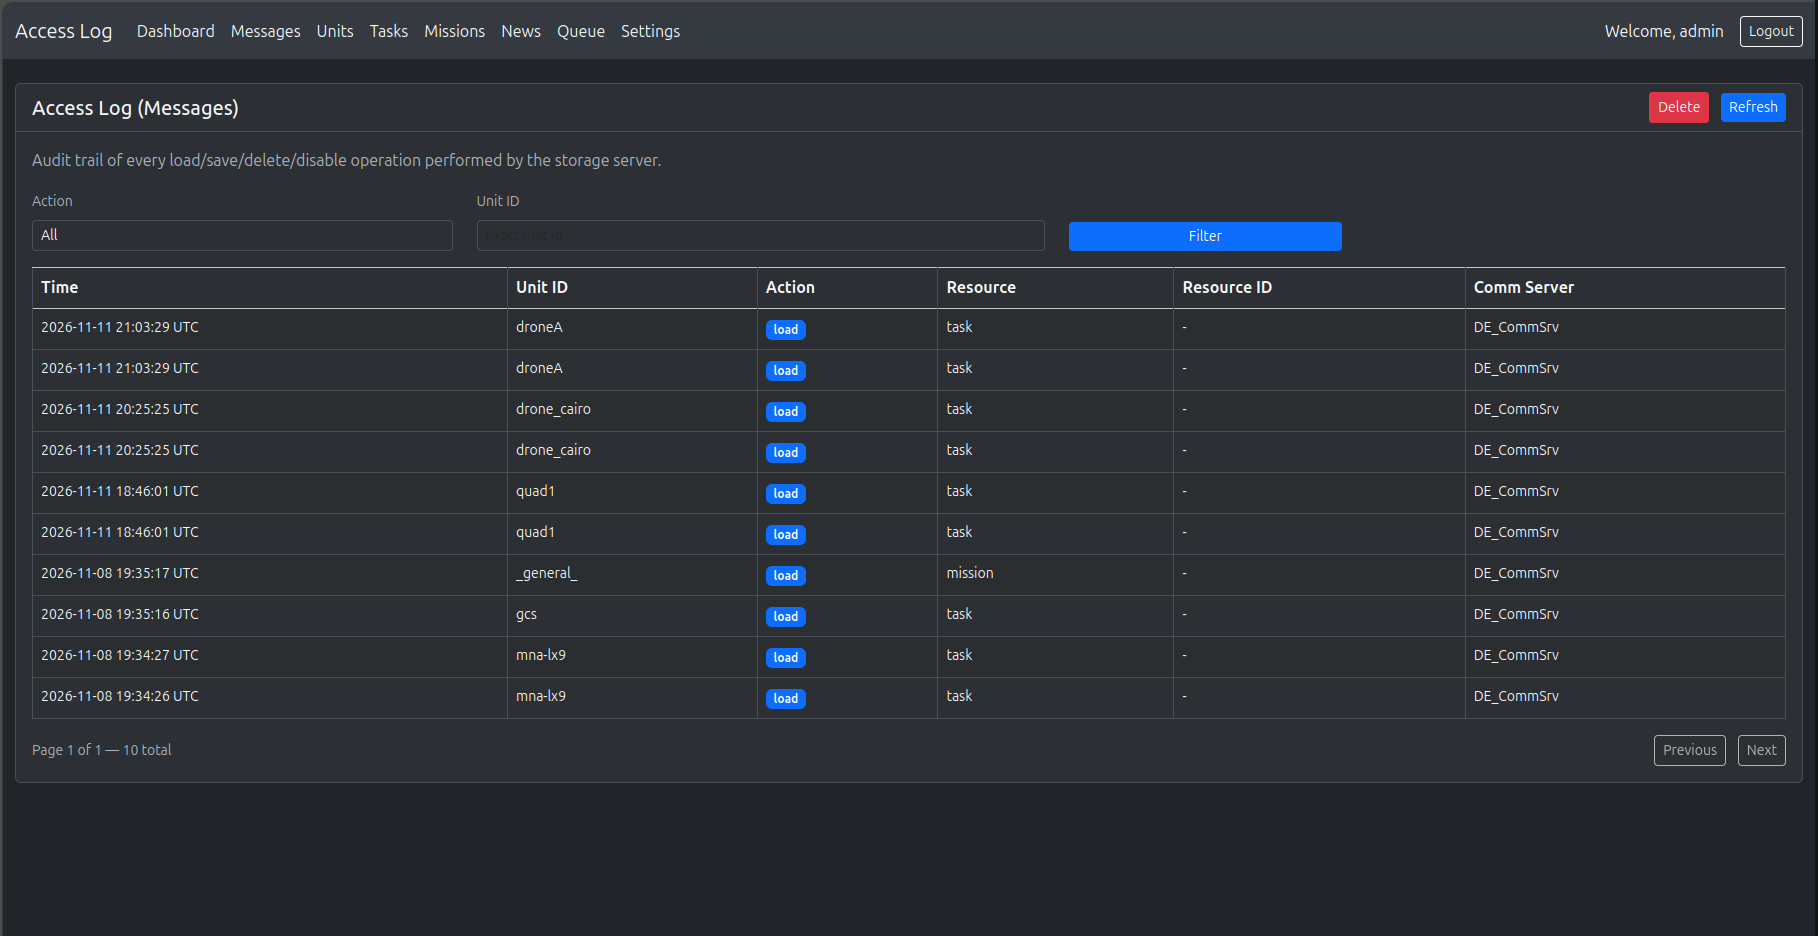
See the access log of the storage requests. You can clear it. |
Units |
See the units that use the Storage Server. |
Tasks |
See the saved tasks. |
Missions |
See the saved missions of each account. You can delete a mission. |
News |
Post, enable, disable and delete news (see below). |
Queue |
See the offline messages that wait for a unit. |
Settings |
Set the quotas for each account. The dashboard saves them in
|
Messages page — each load, save, delete and disable request, with the time, the unit, the resource and the Communication Server. Use Filter to find the requests of one unit. Delete clears the log.
News Across the System
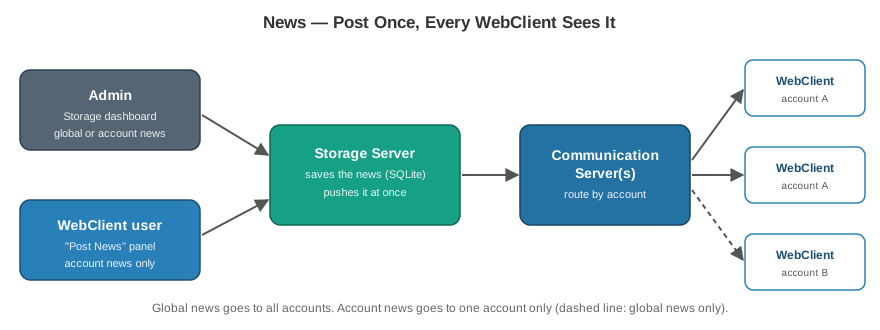
News is a short message that shows in the news panel of each WebClient. Use it to tell all operators about a server update, a weather warning or a change in the plan.
Who can post
Scope |
Posted from |
Who sees it |
|---|---|---|
Global |
The storage dashboard only |
All WebClients of all accounts. |
Account |
The storage dashboard, or the Post News panel of the WebClient |
Only the WebClients of that account. |
Post news from the dashboard
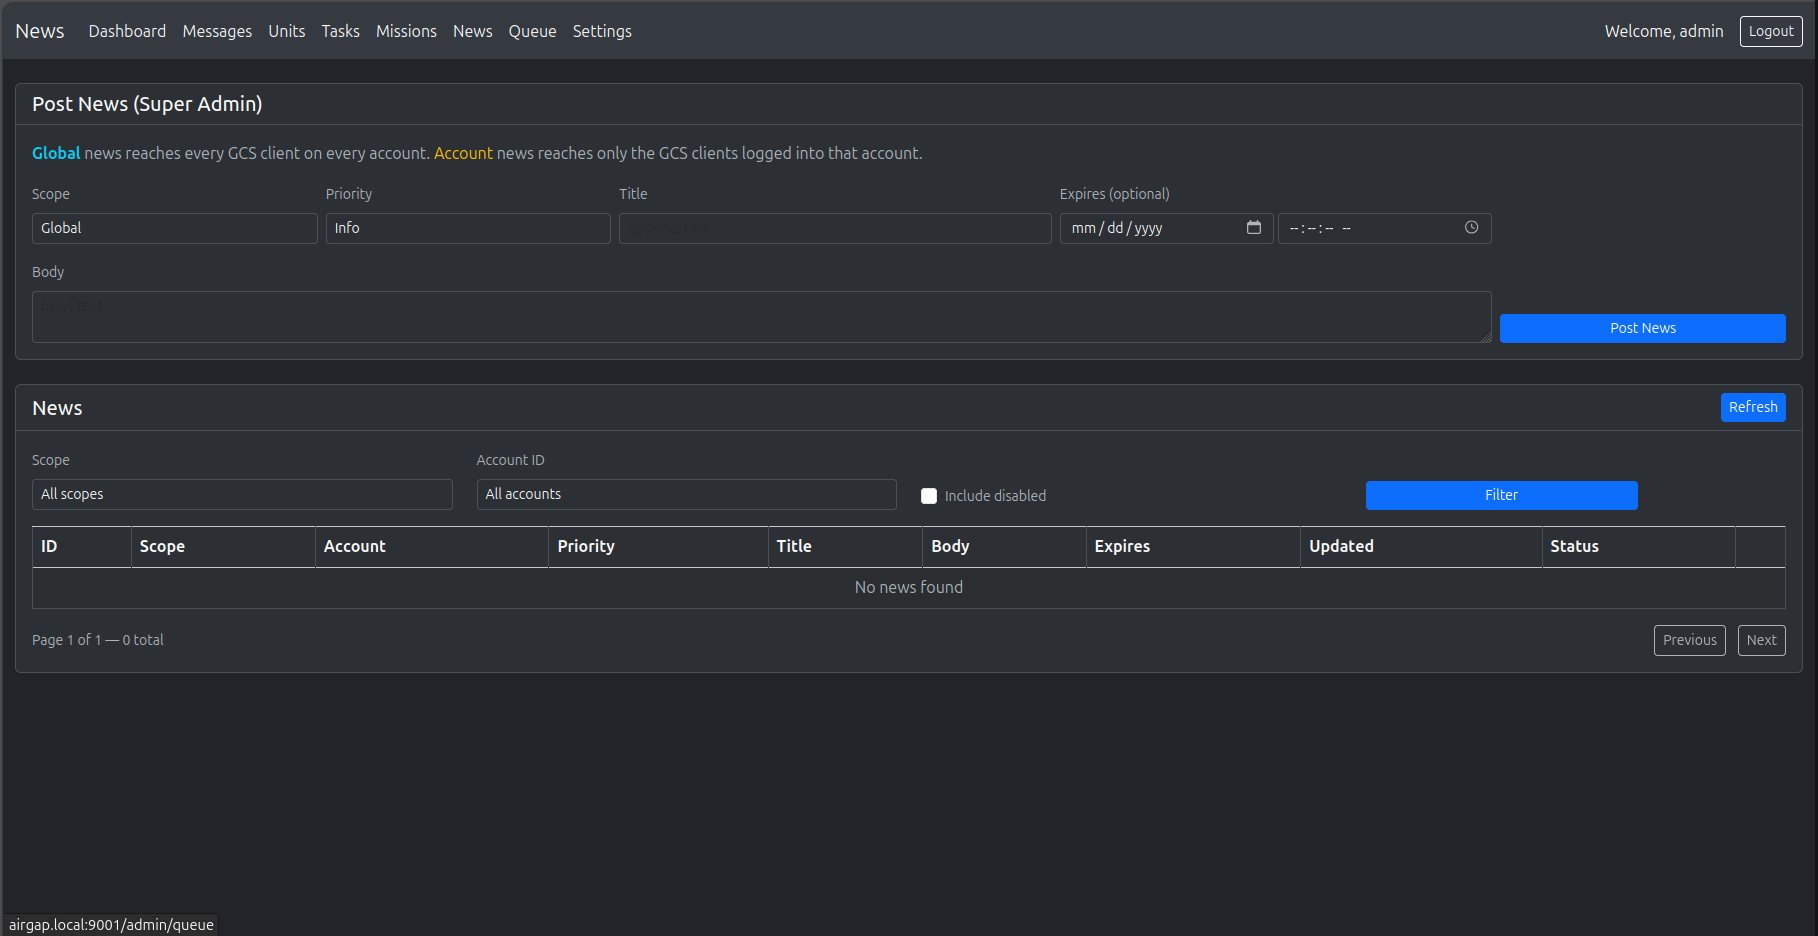
Open the News page.
Select the scope: Global or Account. For Account, type the account ID.
Type the title and the text.
Select the priority: Info, Warning or Critical.
If necessary, set the expiry time. After this time the news does not show.
Click Post News.
The list under the form shows the news. Filter it by scope or account. Select Include disabled to see the disabled news too.
The Storage Server saves the news and pushes it at once. WebClients that are open show it immediately. A WebClient that opens later loads the active news.
Remove news
Disable hides the news. You can enable it again.
Delete removes the news permanently.
Tip
Use max_news_per_account (in the Settings page or in limits)
to stop one account from filling the news panel.
Settings
The settings are in server.config. Put your changes in
server.config.local (see Air-Gap Server: The Four Rust Servers).
Setting |
Default |
What it does |
|---|---|---|
|
|
The name of this server. |
|
|
The IP that the server listens on. Keep |
|
|
The port of the S2S link. |
|
|
Use a secure WebSocket (WSS). |
|
|
|
|
|
The file of the shared secret. The server makes it with a random value at the first start. |
|
|
The SQLite file. The server makes it at the first start. |
|
|
The maximum number of offline messages for each unit. |
|
see below |
Limits for each account, so that one account cannot fill the disk. You can also change them on the dashboard Settings page. |
|
empty |
A secret word. When set, the dashboard is only at
|
|
|
Show the admin dashboard. |
|
|
The port of the dashboard. |
|
|
The dashboard is on the Pi only. Set |
|
|
The dashboard login. Change the password. You can write
|
|
— |
A long random text that protects the dashboard sessions. |
{
    "server_id"              : "DE_StorageSrv",
    "server_ip"              : "127.0.0.1",
    "server_port"            : 9000,
    "enable_SSL"             : true,
    "ssl_key_file"           : "./ssl_local/ssl_airgap/domain.key",
    "ssl_cert_file"          : "./ssl_local/ssl_airgap/domain.crt",
    "ca_cert_path"           : "./ssl_local/ssl_airgap/root.crt",

    "s2s_cert_enabled"       : false,
    "s2s_shared_secret_file" : "./s2s_shared_secret.key",

    "database": { "path": "./data/storage.db", "maxConnections": 10 },
    "queue":    { "maxQueueSize": 1000, "retryInterval": 5000 },

    "dashboard_enable"       : true,
    "dashboard_port"         : 9001,
    "dashboard_listening_ip" : "127.0.0.1",
    "admin_username"         : "admin",
    "admin_password"         : "$$HASH$$('my-new-password')",
    "session_secret"         : "write-a-long-random-text-here",

    "limits": {
        "max_news_per_account"     : 50,
        "max_missions_per_account" : 200,
        "max_missions_per_unit"    : 50,
        "max_mission_bytes"        : 1048576
    }
}
Connect the Communication Server
Set these values in the config of the Communication Server:
{
    "enable_storage_server"  : true,
    "storage_server_host"    : "127.0.0.1",
    "storage_server_port"    : 9000,
    "s2s_shared_secret_file" : "./s2s_shared_secret.key"
}
Copy s2s_shared_secret.key from the Storage Server folder to the
Communication Server folder. The two files must be the same.
Back Up the Data
All data is in one file: data/storage.db. To back it up:
Stop the server:
sudo systemctl stop de_storage
Copy
data/storage.dbto a safe place.Start the server again:
sudo systemctl start de_storage