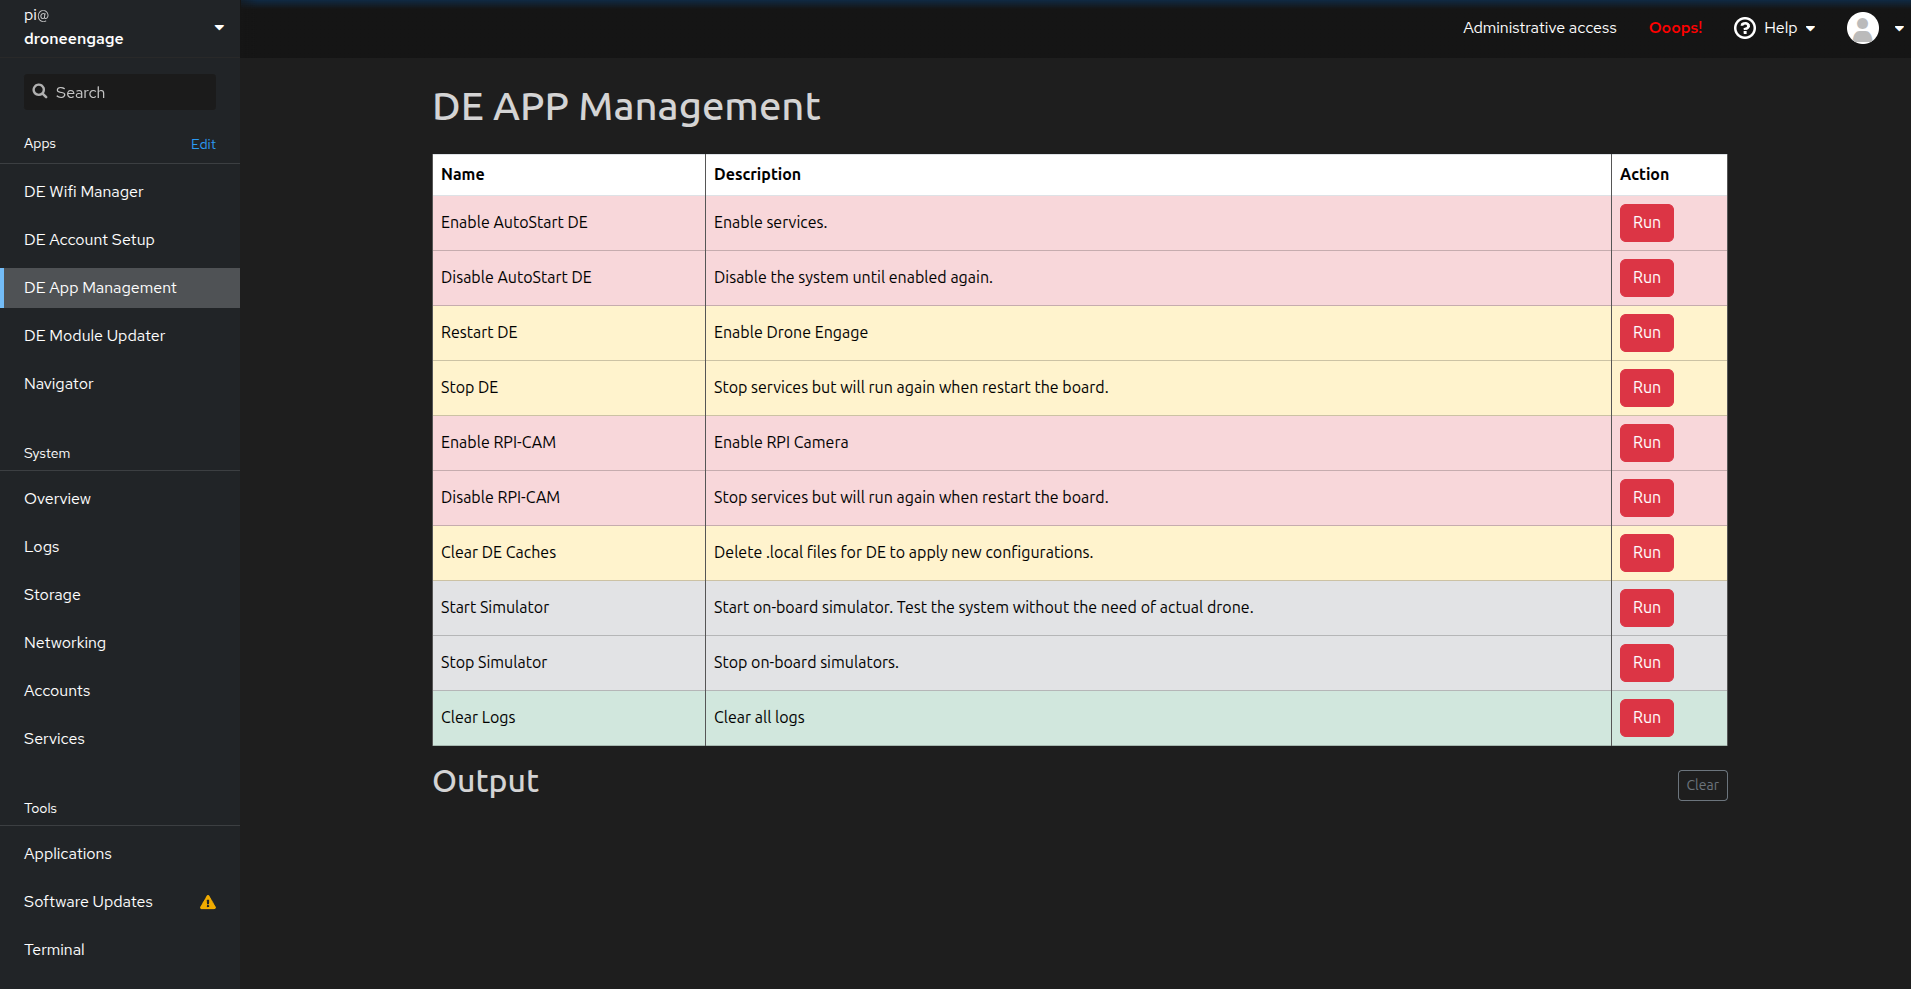
DE APP Management
The DE APP Management screen provides quick access to common system administration tasks for your DroneEngage unit. It allows you to control services, manage the camera, run simulators, and perform maintenance operations.
Available Commands
The screen displays a table of available management commands, each with a Name, Description, and Run button.
Service Control
Command |
Description |
|---|---|
Enable AutoStart DE |
Enables DroneEngage services to start automatically on boot and restarts them immediately. Use this to activate the system. |
Disable AutoStart DE |
Disables automatic startup of DroneEngage services. The system will remain inactive until explicitly enabled again. |
Restart DE |
Restarts all DroneEngage services. Useful after configuration changes or to recover from issues. |
Stop DE |
Stops all DroneEngage services temporarily. Services will automatically start again on the next system reboot. |
Camera Control
Command |
Description |
|---|---|
Enable RPI-CAM |
Enables and starts the Raspberry Pi camera service for video streaming. |
Disable RPI-CAM |
Stops the Raspberry Pi camera service. The service will restart on the next system reboot. |
Maintenance
Command |
Description |
|---|---|
Clear DE Caches |
Deletes local configuration cache files ( |
Clear Logs |
Removes all log files from the system. Useful for freeing up disk space or starting fresh logging. |
Simulator
Command |
Description |
|---|---|
Start Simulator |
Starts the on-board drone simulator. Allows you to test the system without connecting an actual drone. |
Stop Simulator |
Stops all running on-board simulators. |
Output Area
The Output section at the bottom of the screen displays real-time feedback from executed commands.
Shows “Running script…” while a command is executing
Displays the script output as it runs in real-time
Shows success or error messages upon completion
Clear button - Clears all output messages from the display
Color Coding
The table rows are color-coded to indicate the impact level of each command:
Red rows - Critical operations that affect system startup behavior (Enable/Disable AutoStart, Camera controls)
Yellow rows - Service operations that are temporary until reboot (Restart, Stop, Clear Caches)
Gray rows - Simulator operations (Start/Stop Simulator)
Green rows - Safe maintenance operations (Clear Logs)
Typical Workflows
Initial System Activation:
Click Enable AutoStart DE to enable and start all services
Verify success in the Output area
The system will now start automatically on every boot
Testing Without a Drone:
Click Start Simulator to launch the on-board simulator
Use the DroneEngage web client to connect and test features
Click Stop Simulator when testing is complete
Applying Configuration Changes:
Make your configuration changes (via Account Setup or config files)
Click Clear DE Caches to remove cached configurations
Click Restart DE to restart services with new settings
Temporary Service Stop:
Click Stop DE to temporarily halt all services
Perform maintenance or debugging tasks
Click Restart DE to resume, or simply reboot the system
Disabling the System:
Click Disable AutoStart DE to prevent services from running
The system will remain inactive even after reboots
Click Enable AutoStart DE when ready to reactivate
Warning
Enable/Disable AutoStart commands have persistent effects that survive reboots. Use Stop/Restart commands for temporary service control.
Tip
Use the simulator feature to familiarize yourself with the DroneEngage system before connecting to an actual drone.
Video Tutorials
For step-by-step video guides on using the DE APP Management features, visit the DroneEngage tutorial playlist: