Air-Gap Server: The Four Rust Servers
The air-gap server (airgap.local) is one Raspberry Pi that runs the full
DroneEngage backend. It does not need the internet. Vehicles, the WebClient
and MAVLink ground stations connect to it on the local network.
The backend has four servers. Each server is a small Rust program with one job and one config file.
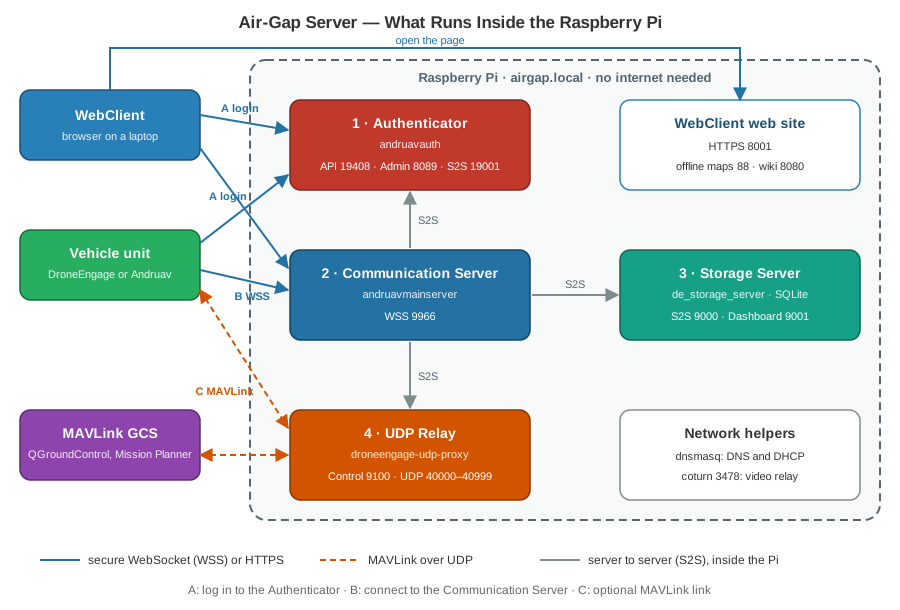
The Four Servers
Server |
Program |
Job |
|---|---|---|
|
Checks the email and access code of each user and unit. Tells the client which Communication Server to use. Has an admin web page. |
|
|
Keeps a WebSocket open to each unit and each WebClient. Routes all messages: telemetry, commands, video signaling and missions. |
|
|
Keeps tasks, missions and news in a SQLite database. Keeps messages for units that are offline, and sends them when the unit comes back. Sends news to all WebClients. Has an admin dashboard. |
|
|
Relays MAVLink between a vehicle and QGroundControl or Mission Planner. This server is optional. |
Note
The earlier backend was written in Node.js and had only two servers. The UDP proxy was inside the Communication Server, and there was no Storage Server. The new Rust servers keep the same wire protocol, so units and the WebClient work without changes.
How a Client Connects
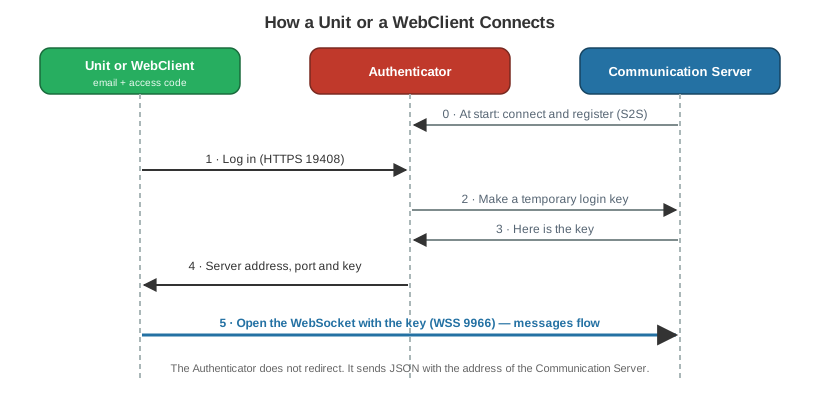
When the Communication Server starts, it connects to the Authenticator and registers.
The unit or the WebClient sends its email and access code to the Authenticator.
The Authenticator gets a temporary login key from the Communication Server.
The Authenticator sends the server address, the port and the key to the client.
The client opens a secure WebSocket to the Communication Server with this key.
Ports
These are the default ports. You can change each port in the config file of its server.
Server |
Port |
Used for |
Who connects |
|---|---|---|---|
Authenticator |
19408 |
Login API (HTTPS) |
Units, WebClient |
Authenticator |
8089 |
Admin web page |
You, from a browser |
Authenticator |
19001 |
S2S link |
Communication Server (local only) |
Communication Server |
9966 |
Messages (WSS) |
Units, WebClient |
Storage Server |
9000 |
S2S link (WSS) |
Communication Server (local only) |
Storage Server |
9001 |
Dashboard |
You, from a browser |
UDP Relay |
9100 |
Control link (WSS) |
Communication Server |
UDP Relay |
40000–40999 |
MAVLink (UDP) |
|
WebClient web site |
8001 |
WebClient page (HTTPS) |
Browsers |
Map server |
88 |
Offline map tiles |
WebClient |
Wiki |
8080 |
This wiki and |
Everybody |
Tip
S2S means server to server. These links are inside the Pi. Each server proves who it is before the other server accepts it. Two methods are available: Ed25519 keys, or a shared secret (HMAC). The shared secret is the easier method for a single Pi.
Config File Rules
All four servers use the same config rules:
Each server reads
server.configfrom its own folder.Put your own changes in
server.config.localin the same folder. The server reads it afterserver.config, and its values replace the values with the same name. An update does not overwrite your.localfile.You can write comments in the config files with
//and/* */.To use a different file, start the server with
--config=<file>.For a password, write
$$HASH$$('my-password'). At the next start the server changes it to a bcrypt hash and saves the hash in the file.
Example — server.config.local for the Communication Server:
{
    // the IP or name that phones and laptops use to reach this Pi
    "public_host" : "192.168.1.161"
}
Settings You Must Change
The default files work on a test bench. Before you use the Pi in the field, change these settings:
Server |
Setting |
Why |
|---|---|---|
Authenticator |
|
The default account is public in this wiki. |
Authenticator |
|
They protect the admin web page. |
Storage Server |
|
They protect the dashboard. |
Communication Server |
|
Phones and laptops must reach this name or IP. |
UDP Relay |
|
QGroundControl must reach this name or IP. |
All S2S links |
|
Use the same random secret on all servers (see below). |
Build and Start
Each server is a Rust project. Build each one on the Pi:
cargo build --release
Start the servers in this order:
Authenticator
Storage Server
UDP Relay
Communication Server
The Communication Server connects to the other three, and it tries again if one of them is not ready.
Start each server from its own folder, because the server reads its config and SSL files from the current folder.
Example — a systemd service for the UDP Relay:
[Unit]
Description=DroneEngage UDP relay server
After=network-online.target
Wants=network-online.target

[Service]
Type=simple
User=droneengage
WorkingDirectory=/opt/droneengage/udp_proxy
ExecStart=/opt/droneengage/udp_proxy/droneengage-udp-proxy
Restart=on-failure
RestartSec=3
LimitNOFILE=65536

[Install]
WantedBy=multi-user.target
Make one service for each server: de_auth, de_storage,
de_udp_relay and de_comm. Then enable them:
sudo systemctl daemon-reload
sudo systemctl enable --now de_auth de_storage de_udp_relay de_comm
To see the log of a server:
journalctl -u de_comm -f
Check That It Works
Open the admin page of the Authenticator:
https://airgap.local:8089.Log in. Open Servers.
Make sure that the Communication Server card shows Online.
Open the WebClient:
https://airgap.local:8001.Log in with the account of the Authenticator.
Start a unit. Make sure that it shows on the WebClient map.
Important
Each phone and laptop must trust the root certificate of the Pi. Without it, the browser and Andruav refuse the secure connection. See Air-Gap RPI-4 with Access Point for the steps.
Performance on a Raspberry Pi 4
We tested the earlier Node.js server and the new Rust server on the same Raspberry Pi 4 (4 cores, 1 GB RAM). A laptop flooded the server with messages for 8 seconds in each test.
Test |
Node.js delivered |
Rust delivered |
Rust CPU |
|---|---|---|---|
3 drones + 1 GCS, broadcast |
1,906 msg/s |
75,648 msg/s |
3.3 cores |
7 drones + 2 GCS, broadcast |
555 msg/s |
37,417 msg/s |
3.2 cores |
12 pairs, point to point |
1,904 msg/s |
24,331 msg/s |
3.4 cores |
Node.js uses only one core. The Rust server uses all four cores of the Pi. This is a stress test. A real vehicle sends far fewer messages, so the numbers show how much spare capacity one small Pi has.
Source Code
Authenticator: droneengage_authenticator
Communication Server: droneengage_server
Storage Server: droneengage_storage_server
UDP Relay: droneengage_udp_proxy
Shared library: droneengage_server_common